Feature
Camera views and auto zoom for screen recordings
Switch between screen, camera bubble, side by side and full-screen camera, zoom in on part of the screen, or let Direct my video suggest the shots for you.
Updated
A screen recording is easier to follow when the picture changes with what you’re saying: the whole screen while you set the scene, a zoom on the button you’re about to click, your face when you make the point that matters. In the Video Editor you can switch camera views like a live switcher, zoom in on part of the screen, or ask the AI director to plan the shots and review what it suggests.
The four views
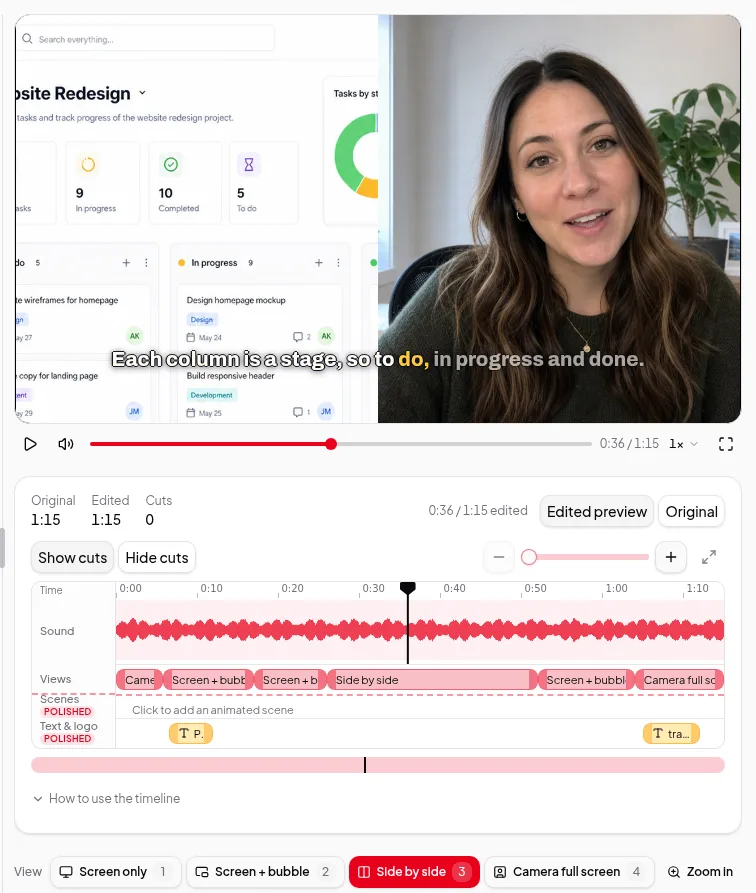
For a Screen + camera take made with the built-in recorder, the camera is saved as its own file, so you can choose how the two are shown at any moment:
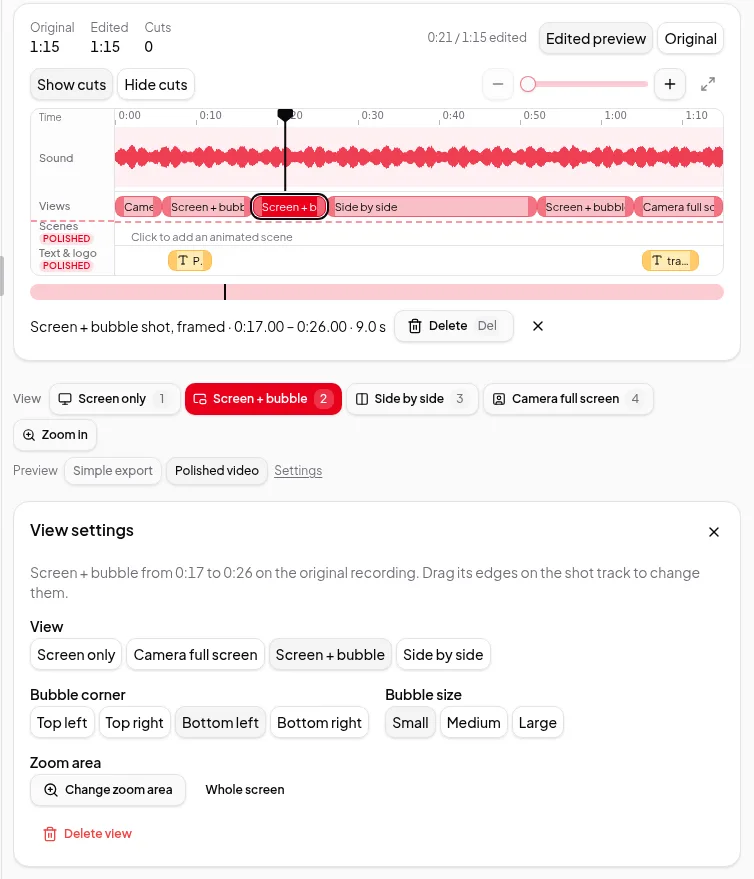
- Screen only (key 1) — just the screen. Your voice carries on.
- Screen + bubble (key 2) — the screen with you in a camera bubble in a corner.
- Side by side (key 3) — the screen and your camera next to each other.
- Camera full screen (key 4) — just you, for an introduction or a key point.
Play the video and click a view, or press its number while the player or the timeline has focus. The new view starts at the playhead and lasts until the next change. To set a view for an exact part, select words in the transcript or a stretch of the timeline and pick a view from the View menu.
Each view shows as a block on the timeline’s Views row. Click a block to open View settings: change the view, pick the Bubble corner (top left, top right, bottom left or bottom right) and Bubble size (Small, Medium or Large), or delete it. Drag a block’s edges to change when it starts and ends.
Zoom in on part of the screen
Click Zoom in under the player and Vidonto zooms on part of the screen for a few seconds from the playhead, keeping the view that was showing there. A box appears on the player: drag it over what to show — the menu, field or chart you’re talking about — resize it from its corner, and click Done. The box keeps the shape of the picture, so nothing is trimmed. In View settings, Change zoom area moves it again and Whole screen takes the zoom away.
Zoom in works on any recording, including screen-only recordings and files you upload. The four camera views need a screen + camera take recorded in Vidonto.
Let the AI director suggest the shots
Open AI director, choose what to Plan for — Landscape 16:9, Vertical 9:16 or Square 1:1 — and click Direct my video. The director reads what you say and what happens on screen, then suggests:
- Shots — views and zooms, such as a zoom on the part of the screen you’re working in, or your camera full screen for the opening.
- Scenes — animated moments such as a quote, a list or a key figure, for polished videos.
- On-screen text — short titles and labels on the Text & logo row.
Nothing changes until you decide. Each suggestion has Accept and Reject, text can be changed before you accept it, and Accept all takes everything that doesn’t clash with what you placed yourself. Suggestions never replace a view, scene or text item you added by hand without asking. It keeps going if you close the tab.
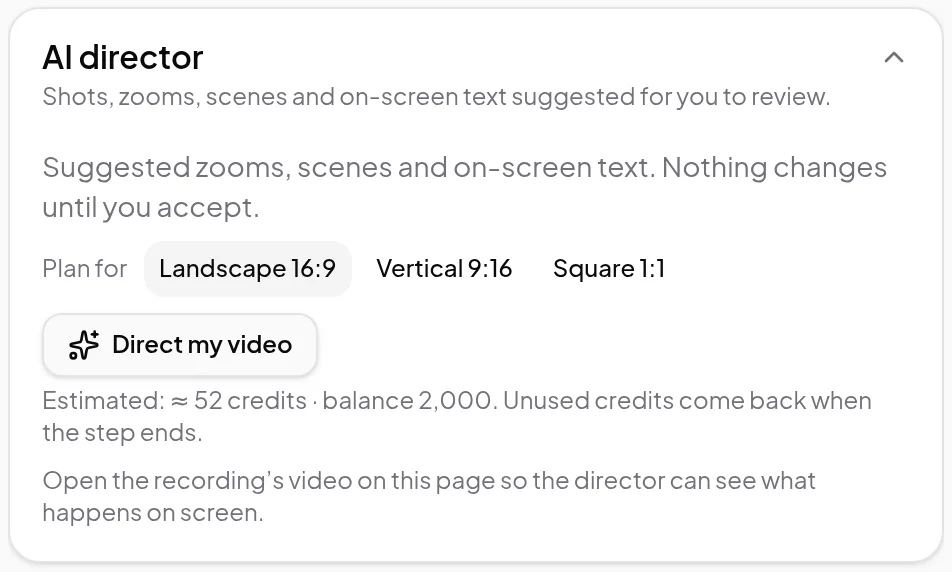
Clicking Direct again replaces only the suggestions you haven’t reviewed yet. Shots, scenes and text you accepted or placed stay as they are.
Where views and zooms show up
Views and zoom areas are part of every export — the free export on your computer, the cloud render and the polished video. Scenes and on-screen text are added in polished videos only. Under the player, Simple export and Polished video preview each one.
If you cut words later, views and zooms follow the edited video. Very short gaps between views are closed up, so the finished video doesn’t flicker between looks.
Limits worth knowing
- Camera views need a screen + camera recording with a separate camera file, as the Video Editor’s recorder makes.
- Zoom in can’t be used while the camera is full screen.
- Open the recording’s video on the page before directing, so the director can see what happens on screen.
- The director suggests from your words and the screen. It doesn’t add facts you didn’t say, and you can reject anything it suggests.
- A suggested shot that would be too short after your cuts, or that overlaps a shot you placed, can’t be accepted as it is.
Credits
Switching views, zooming in by hand and changing view settings are free. Direct my video uses credits; the estimate is shown next to the button before it runs, and nothing is charged if directing fails. See credits explained.
Step by step: auto-zoom and frame a screen recording.